This article is the English translation of the Japanese article titled ‘wordpressから静的サイトジェネレータastroにブログを移行する方法’.
Recently, I migrated my Linux-focused blog, “Kuro’s Thinking Notes”, from WordPress to Astro, a static site generator. In this post, I’ll walk you through the migration process and share some technical details and considerations.
What is Astro?
Astro is a static site generator built with JavaScript. Similar tools include Gatsby, Pelican, Hugo, and Hakyll. Like most static site generators, content in Astro can be sourced from Markdown files (with YAML frontmatter) or pulled from a CMS.
True to its name, Astro builds static sites—comprised of plain HTML, CSS, and JavaScript—which makes deployment incredibly simple. Just upload the generated files to a web server, and you’re good to go.
Migration Strategies: WordPress to Astro
There are multiple ways to migrate a WordPress site to Astro. Broadly, you can either continue using WordPress as a headless CMS or fully transition to managing content via Markdown files.
1. Using WordPress as a Headless CMS
In this method, WordPress acts as a backend CMS, and Astro fetches content from its API in JSON format to generate the frontend.
- Pros: No need to manage Markdown files locally; content can be managed via WordPress’s familiar dashboard.
- Cons: You’ll still need to maintain your WordPress backend.
2. Managing Content via Markdown in Astro
This approach involves exporting your content to local Markdown files. Each file includes YAML frontmatter for metadata like titles and dates.
- Pros: Full independence from WordPress; all content is managed locally in a simple, text-based format.
- Cons: As your content grows, managing it manually can become cumbersome, and there’s no database for dynamic metadata changes.
Of course, other combinations are possible too—such as migrating to a different CMS and using Astro for the frontend.
My Migration Setup
Here are the parameters I used for my blog migration:
| Item | Description |
|---|---|
| Content Management | Markdown files |
| Deployment Target | VPS |
| Web Server | Nginx |
| Build Environment | Local build |
| Deployment Method | File upload via rsync |
Exporting Data from WordPress
Start by exporting your content from WordPress. From the WordPress admin dashboard, go to Tools > Export, and you’ll see a screen like this:
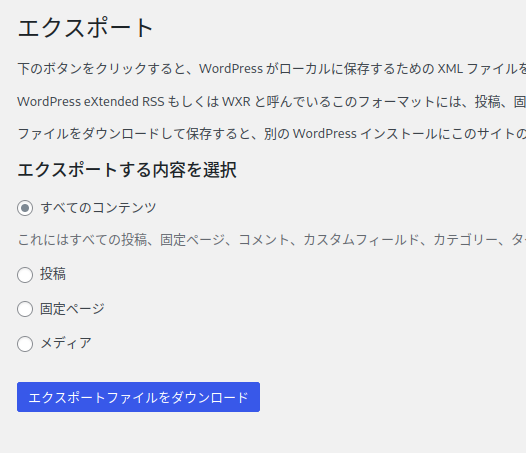
Select the content you wish to export and download the resulting XML file.
Converting WordPress Export to Markdown
Next, convert the exported XML data into Markdown files. There are several tools for this, and even some mentioned on the official WordPress site. However, many are not tailored for Astro and lack support for things like the layout frontmatter.
So, I created my own tool: wp-to-astro. This CLI tool converts WordPress exports to Markdown files optimized for Astro, including automatic addition of the layout frontmatter.
Here’s an example command that converts export.xml, sets the layout to ../layouts/post.astro, and outputs files to the ./output directory:
npm install kurocode25/wp-to-astro
npx wp-to-astro \
--outdir ./output \
--layout ../layouts/post.astro \
export.xml
Migrating Media Files
There are several ways to handle media files. In my case, since the site is hosted on an Nginx server, I simply copied the wp-content/uploads directory to the server’s root directory. Then, I configured Nginx so that the same image URLs would work for both the old WordPress and the new Astro site.
Details on this configuration are shared in the Nginx section below.
RSS Feed and URL Handling
Using the @astrojs/rss package, I generated an RSS feed at /rss.xml.
Previously, my WordPress RSS feed URL was:
https://note.kurodigi.com/?feed=rss2
To preserve this legacy URL, I used an Nginx rewrite rule to map it to the new Astro-generated rss.xml. (See the Nginx config section below.)
Generating a Sitemap
Astro makes it easy to generate a sitemap using the @astrojs/sitemap integration.
Just add the integration to your astro.config.mjs file like so:
import { defineConfig } from 'astro/config';
import sitemap from '@astrojs/sitemap';

export default defineConfig({
  site: 'https://stargazers.club',
  integrations: [sitemap()],
});
Once you build the site, sitemap-index.xml will be generated at the root.
Configuring Nginx for the Astro Site
Here’s a sample Nginx configuration that supports:
- The main Astro site
- Legacy RSS feed URLs
- Serving old WordPress image URLs
Note: SSL config is omitted for simplicity.
server {
  listen 80;
  server_name note.example.com;

  # Serve static Astro files
  location / {
    root /var/www/html/note;
    index index.html;
    try_files $uri $uri/ /index.html;

    if ($args ~* 'feed=rss2') {
      set $args '';
      rewrite ^ /rss.xml break;
    }
  }

  # Serve legacy WordPress images
  location ^~ /wp-content/ {
    alias /var/www/note/wp-content/;
  }
}
Build & Deploy
Once everything is ready, run a production build with Astro, then upload the static files to your server. While this process can be automated via CI/CD, I personally build locally and deploy using rsync.
Final Thoughts
This post summarizes the process I followed to migrate my blog from WordPress to Astro using Markdown-based content management. The current setup supports static SSR, a sitemap, and RSS. Next steps include adding social share buttons and a search feature.
